Monday, October 15, 2012

Shall I Compare Thee to a Summer’s Day?

Sonnet 18 deserves its fame because it is one of the most beautifully written verses in the English language. The sonnet’s endurance comes from Shakespeare’s ability to capture the essence of love so cleanly and succinctly.

Shall I compare thee to a summer's day? 


Shall I compare thee to a summer's day?
Thou art more lovely and more temperate:
Rough winds do shake the darling buds of May,
And summer's lease hath all too short a date:
Sometime too hot the eye of heaven shines,
And often is his gold complexion dimm'd;
And every fair from fair sometime declines,
By chance or nature's changing course untrimm'd;
But thy eternal summer shall not fade
Nor lose possession of that fair thou owest;
Nor shall Death brag thou wander'st in his shade,
When in eternal lines to time thou growest:
So long as men can breathe or eyes can see,
So long lives this, and this gives life to thee. 


That Time Of Year Thou Mayst In Me Behold

Shakespeare’s Sonnet 73 is the third of four poems concerned with ageing (Sonnets 71-74). It is also hailed as one of his most beautiful sonnets. The speaker in the poem suggests that his lover will love him more, the older he gets, because his physical ageing will remind him that he will die soon.


That Time Of Year Thou Mayst In Me Behold


That time of year thou mayst in me behold
When yellow leaves, or none, or few, do hang
Upon those boughs which shake against the cold,
Bare ruin'd choirs, where late the sweet birds sang.
In me thou seest the twilight of such day
As after sunset fadeth in the west,
Which by and by black night doth take away,
Death's second self, that seals up all in rest.
In me thou see'st the glowing of such fire
That on the ashes of his youth doth lie,
As the death-bed whereon it must expire
Consumed with that which it was nourish'd by.
This thou perceivest, which makes thy love more strong,
To love that well which thou must leave ere long.

tutorial : Diffraction, Aperture, and Starburst Effects

Starburst effects can add an interesting element to a photograph. In a dark, moody scene, it can add a dreamy, peaceful twinkle to the lights. In a daytime scene, a starburst effect from the sun can add drama and interest to otherwise uneventful skies.


 Starburst Filters

  • glass filters with a grid on the surface that created the “starburst” effect.
  • these filters created interesting starbursts, and also caused a rainbow-like effect in the light called dispersion as well as softness issues in the images

Diffraction and Starbursts Defined

  • Diffraction is the slight bending of (light) waves around small obstacles and the spreading out of (light) waves past small openings. 
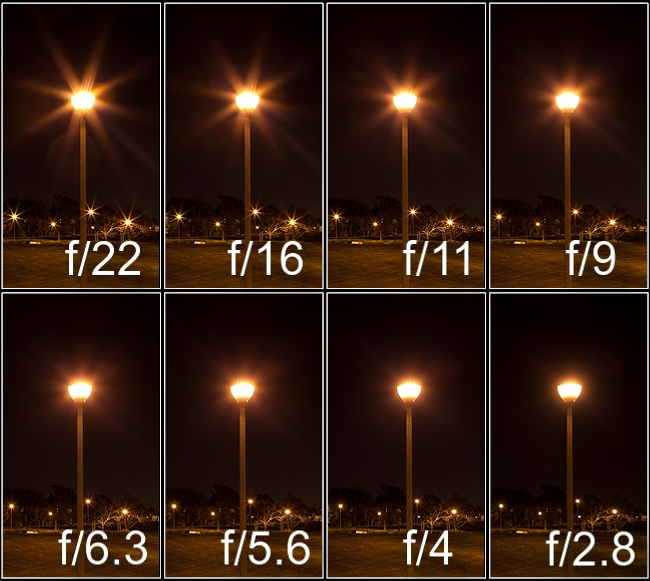
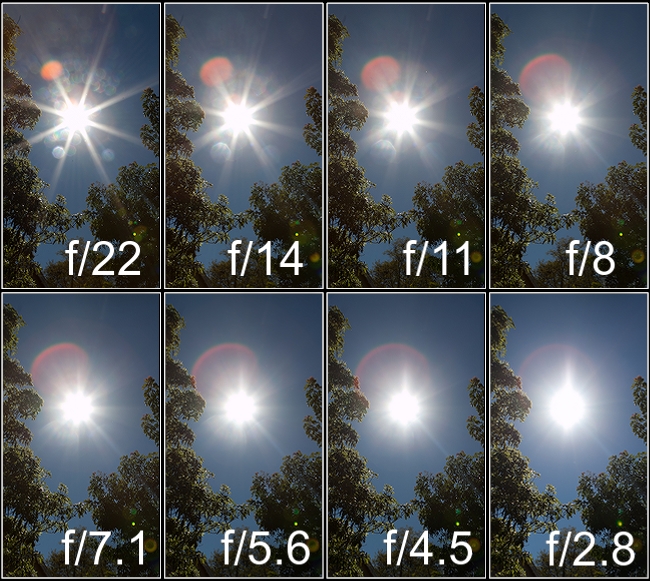
  • a small aperture at a low focal length, it bends around the edges of the blades and creates the “star” look.
  • The following charts show the effect of aperture on the size of the starbursts.
starburst day Diffraction, Aperture, and Starburst Effects
starburst night Diffraction, Aperture, and Starburst Effects

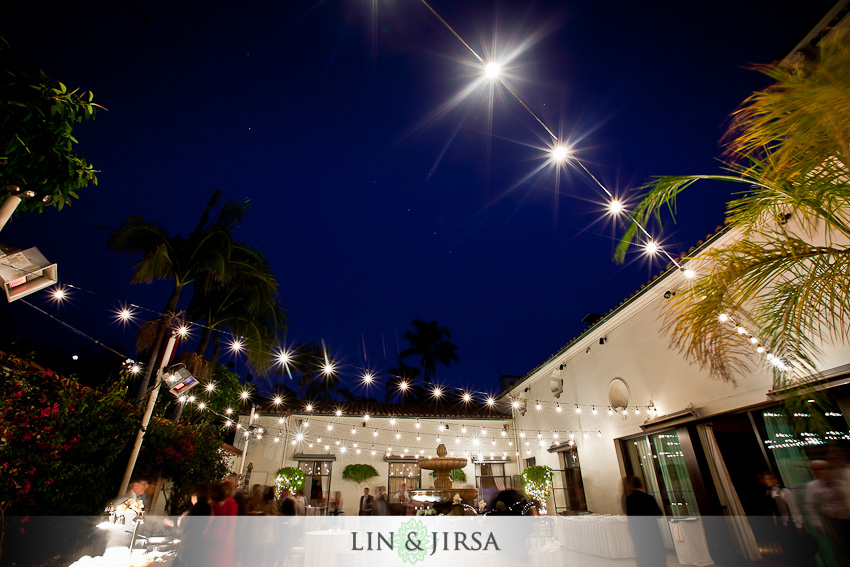
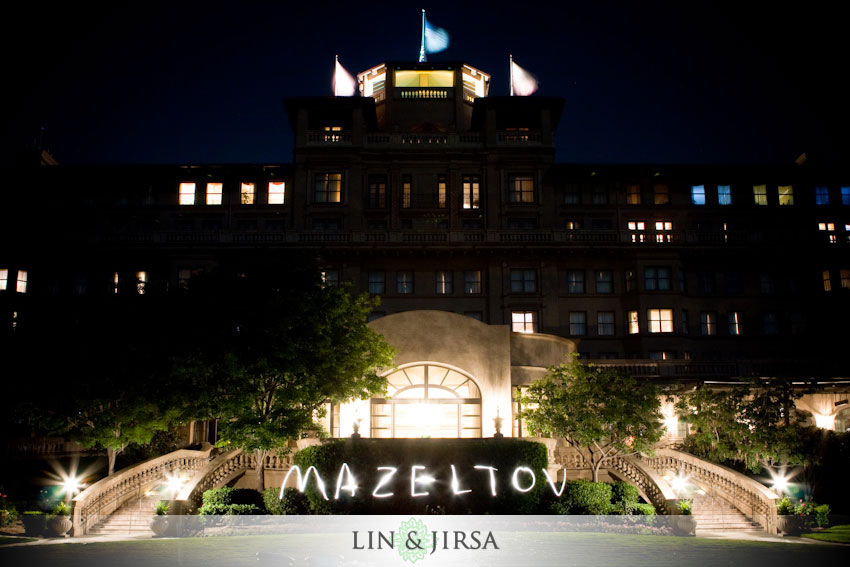
Night Time Starburst Tutorial

014 bell air bay club malibu wedding photography Diffraction, Aperture, and Starburst Effects

1) Use a Tripod and Remote Trigger
  • At such small apertures and such low light, you’re not going to get a crisp handheld shot, so you’ll need a tripod and a remote trigger
  • Any sturdy tripod will work, as will any reliable remote trigger.
  • If you don’t have either of these, you might be able to get away with setting your camera on a solid object and using the two second timer, however your composition options would be limited.
2) Set Camera Settings 
  • use a small aperture of f/11 or smaller. 
  • The smaller you make your aperture, the more diffraction you’ll get and the more “starburst” you’ll see in your image.  
  • the lower your focal length, the smaller the physical opening of the aperture

3) Turn on Your Highlight Alert 
  • Most digital cameras have a highlight alert option that will show you when your highlights are blown out. 
  • This is important to turn on because you want to see if you’re blowing out, i.e. losing unrecoverable detail, in any parts of your image. 

4) Set your Focus 
  • For wide landscape and cityscape scenes, you’ll likely be at infinity. 
  • switch your focus to Manual on the lens to ensure that your camera doesn’t auto focus to the wrong plane.
5) Take the Picture, Adjust and Repeat 
  • As you use your remote trigger to take the picture, make sure you don’t bump your tripod while the shutter is open. 
  • unless you’re really experienced , that first image likely won’t come out exactly as desired, so just adjust and repeat until you get it.
6) Experiment with Additional Creativity
  • Consider applying additional techniques such as light writing
tt pasadena the langham hotel jewish wedding photography 7 Diffraction, Aperture, and Starburst Effects

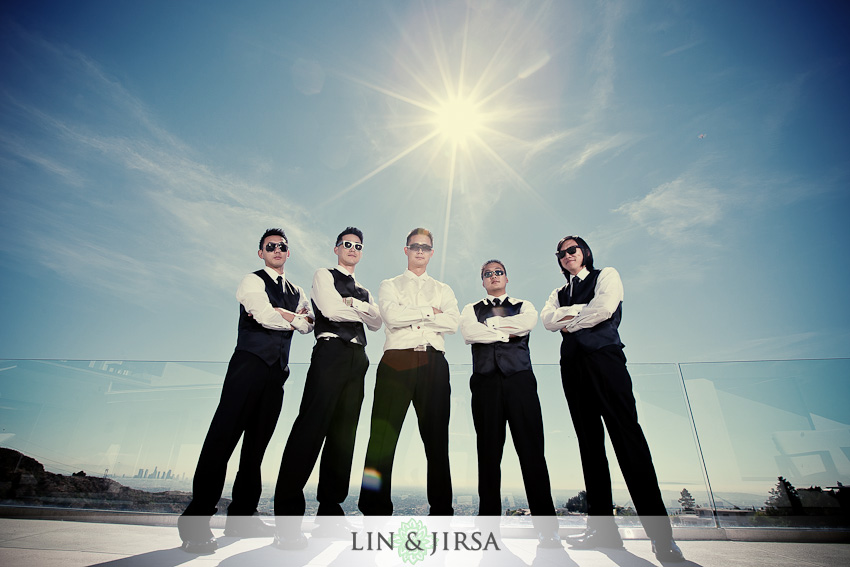
Day Time Starburst Tutorial

  • “Starbursts” from the sun use the exact same concepts as starbursts at night. 
  • The main issue you’ll face is that, in the day time, you’re shooting into the light and the sun is likely much brighter than your subjects. 
  • In this case, you’ll have to use another light source, most likely external flash, to light your subjects or the foreground objects so they’re not underexposed.
greystone mansion wedding photography beverly hills 01 Diffraction, Aperture, and Starburst Effects

1) Turn on Your Highlight Alert 
  • this is important to see where you’re losing detail and overexposing the scene. 
  • a little underexposure, especially at ISO 50 is going to still work out great.
2) Set Up the Right Camera Settings 
  • ISO is going to be as low as you can go
  • shutter speed is likely going to be at 1/200, as high as it can go while still syncing with external flashes. 
  • Your aperture will vary depending on the amount of light, the amount of “starburst” you want, and the amount of light you’re able to get onto your subject from your flashes or reflectors to properly expose them.
  • be on Full Manual Mode for this one
3) Set Up Your Lighting 
  • You’re going to need a couple of powerful external flashes.
  • You’ll also need another type of remote trigger for your flash. 
  • You can choose how you want to angle the flashes and experiment with different distances and zooms of the Flashes until you get your desired look.
4) Fire Away, Adjust and Fire Again 
  •  Take your time, adjust your settings, adjust your flashes, and keep trying until you get exactly what you want.
 please visit this link for detail
http://www.slrlounge.com/diffraction-aperture-and-starburst-effects 

Tuesday, October 2, 2012

Splashing Water Text Effect

a tutorial from: 

http://www.psdvault.com


Step 1

  • Create a new document .
  • fill the background layer with black. 
  • Load the Lake stock image into Photoshop.
  • use the Lasso Tool , draw a selection of the lake portion

1 select 500x305 Create Awesome Splashing Water Text Effect in Photoshop

  • Copy and paste the selection on to canvas

1 erase 500x268 Create Awesome Splashing Water Text Effect in Photoshop

  • Duplicate the water layer twice,.
  • move the duplicated layer to the left and right of the original water layer, as shown below: (set the layer opacity to slightly lower than the original water layer to create depth)
1 dup 500x249 Create Awesome Splashing Water Text Effect in Photoshop
  • Duplicate the original water layer once more.
  • resize it to a smaller piece and position it to the center.
  • increase the layer opacity to 100%
1 center 499x286 Create Awesome Splashing Water Text Effect in Photoshop
  • Add the following two adjustment layers on top of all layers created so far:
Curves 


1 curves1 Create Awesome Splashing Water Text Effect in Photoshop

Levels

1 levels1 Create Awesome Splashing Water Text Effect in Photoshop

1 effect 2 500x325 Create Awesome Splashing Water Text Effect in Photoshop

Step 2

  • use any font you like
  • type a single letter on the canvas as shown below:
2 type1 500x400 Create Awesome Splashing Water Text Effect in Photoshop
  • Apply the following layer blending options to this text layer
Bevel and Emboss

2 bevel1 500x350 Create Awesome Splashing Water Text Effect in Photoshop

Gradient Overlay

2 grad 1 Create Awesome Splashing Water Text Effect in Photoshop
2 grad 2 500x350 Create Awesome Splashing Water Text Effect in Photoshop

Stroke

2 strk 500x350 Create Awesome Splashing Water Text Effect in Photoshop
  • and here is the effect so far:
2 effect1 500x354 Create Awesome Splashing Water Text Effect in Photoshop

Step 3

  • add some noise to the text .
  • Create a new layer on top of the text called “noise”
  • load the selection of the text layer and fill the selection with black colour, go to Filter > Noise > Add Noise and apply the following setting:
3 noise Create Awesome Splashing Water Text Effect in Photoshop
  • The effect after you apply the noise filter:
3 noise fill Create Awesome Splashing Water Text Effect in Photoshop
  • Change the blending mode of thie noise layer to “screen”
  • drop the layer opacity to around 35%
3 noise screen 500x496 Create Awesome Splashing Water Text Effect in Photoshop
  • Create a new layer on top of the noise layer, name it “light and shadow”
  • use a combination of black and white brush
  • paint it as shown below
3 highlight 500x404 Create Awesome Splashing Water Text Effect in Photoshop
  • Change the blending mode of this light and shadow layer to “Overlay” 
  • add some lighting contrast to the text:
3 effect1 500x515 Create Awesome Splashing Water Text Effect in Photoshop

Step 4

  • paint some water splashing effect around text.
  • Create a new layer called “water splash” 
  • load the water splash brushes into Photoshop (download)
  • choose some brushes from the set and paint around the text, as shown below
4 paint 500x463 Create Awesome Splashing Water Text Effect in Photoshop
  • Make sure when you paint the water splashing effect, use a combination of big and small sized brush sets
  • adjust the flow and opacity of the brush
  • DO NOT just use one setting for the whole thing
4 paint 2 Create Awesome Splashing Water Text Effect in Photoshop
  • Keep adding more water splashing around the text 
  • to be more creative, paint some water streams dropping from the edges
4 paint 3 500x565 Create Awesome Splashing Water Text Effect in Photoshop
  • For the water streams, used a 6px, soft white brush to paint in addition to the water splashing brush
4 draw Create Awesome Splashing Water Text Effect in Photoshop
  • Use the same technique to paint the water stream on the left:
4 draw 2 499x471 Create Awesome Splashing Water Text Effect in Photoshop
  • You can use a small, soft white brush to draw around the edge of the text to create some waterflow/highlight effect
4 border 500x412 Create Awesome Splashing Water Text Effect in Photoshop
  • Highlight effect for the text edges
4 hig 500x363 Create Awesome Splashing Water Text Effect in Photoshop

4 effect1 Create Awesome Splashing Water Text Effect in Photoshop

Step 5

  • make the water splash around the text sharpen a bit. 
  • duplicate the water splash layer you’re painting on once
  • Apply the following Smart Sharpen filter setting to the duplicated layer
5 smart shar 500x317 Create Awesome Splashing Water Text Effect in Photoshop
  • the water splash sharpened and become more visible
5 effect1 500x509 Create Awesome Splashing Water Text Effect in Photoshop
  • create a new layer called “shadow” under the original text layer
  • grab a black soft brush and paint some shadow on the water and under the text
5 paint sha 500x197 Create Awesome Splashing Water Text Effect in Photoshop

5 more splash 500x198 Create Awesome Splashing Water Text Effect in Photoshop
  • To make the text effect more dramatic, add some misty effect by create a new layer named “mist” above the background layer 
  • use a Lasso Tool ,draw a selection around the text
5 selection 500x384 Create Awesome Splashing Water Text Effect in Photoshop
  • Render some cloud inside the selection,
  • drop the layer opacity of this mist layer to around 50%,
5 cloud 500x413 Create Awesome Splashing Water Text Effect in Photoshop

Step 6

  • create a new light on top of all previus layers, use a small white soft brush to paint (single-click) to the points shown below
6 high light Create Awesome Splashing Water Text Effect in Photoshop
  • use the Distrot option (Ctrl + T, then right-click) to adjust the shape of the light, to fit the angel of the latter
6 distort 500x395 Create Awesome Splashing Water Text Effect in Photoshop
  • added one Color Balance image adjustment layer
6 col bal Create Awesome Splashing Water Text Effect in Photoshop
  • Layer Mask on the Color Balance adjustment layer:
6 col bal mask 500x369 Create Awesome Splashing Water Text Effect in Photoshop

final effect

water text flatten 500x371 Create Awesome Splashing Water Text Effect in Photoshop

Visit : http://www.psdvault.com/text-effects/create-awesome-splashing-water-text-effect-in-photoshop/

Monday, October 1, 2012

Tutorial : Photo Manipulate

Photo Manipulate a Surreal Space-Age Landscape

a tutorial by http://psd.fanextra.com


 Step 1

Creating a new document  and fill your canvas with black:

Step 2

Go to filter>noise>add noise and then add noise at 20%, gaussian, (monochromatic).

Step 3

Adjustments panel create a ‘levels’ adjustment layer. Apply the settings shown below in order to generate a nice star-field effect:

Step 4

Create a new layer called ‘clouds’ and go to filter>render>clouds. Then reduce this layer’s opacity to 15%.


Step 5

Now, with your clouds layer selected, go to image>adjustments>levels. Apply the settings below to increase the contrast of your clouds:

Step 6

Create a new layer called ‘radial gradient’. Drag out a radial gradient from the center of your canvas, ranging from yellow (ffe400) to transparent.
Then change this layer’s blend mode to ‘overlay’. Then duplicate this layer twice.


Step 7

Create a new layer called ‘circle’. Now create a circular selection in the center of your canvas and fill it with black. Then apply an inner shadow and outer glow effect (settings below):


Step 8

Download this great image of a mountain range: mountain range.
Cut it out and paste it into the bottom right of your document:

Step 9

Repeat this step with a second mountain range photo: http://www.sxc.hu/photo/1280637.
Erase the edge of this photo so that it blends nicely with the first mountain range:

Step 10

Now apply the levels settings below to your two mountain range images:


Step 11

Cut out and paste in this photo of a house:
House Photo. Make sure that it’s layer is beneath your mountain layers.

Step 12

Now apply the levels settings shown below:

Step 13

Now paste in two more images of buildings and apply the same levels settings.
You may need to decrease the saturation of your photos to fit with your main composition:
House 2 Photo.
House 3 Photo.

Step 14

Now use your dodge/burn tool on each of your mountains and building layers. You want to give the impression of the planet’s light casting light down on your scene. Therefore the lightest areas should be closest to the yellow light, and the darkest areas furthest away from it:
Try not to go overboard with this step, and use a brush exposure of around 50%.

Step 15

Now create a new layer called ‘yellow highlight’. Use a large, soft, yellow (ffd800) paintbrush to paint over the areas that you used your dodge brush on.
Then reduce this layer’s opacity to 10%.
This should give a nice yellow tint, cast from your planet:


Step 16

Copy and paste in this photo of a swan, and position it on top of your right side mountain:
Swan Photo.

Step 17

Now apply the previous levels settings to your swan layer, as well as your dodge/burn brush.
Then apply the yellow highlight brush again, to give that ‘basked in light’ effect:

Step 18

I want to give a shadow to my swan layer, being cast on the mountain range. I start by duplicating my swan layer. Then I flip vertically it and fit it underneath my original swan.
Then I go to edit>transform>warp. I warp the reflected swan to fit better with the shape of my mountain range.
Go to blending options for this layer and apply a black color overlay.
Then go to filter>blur>gaussian blur and apply a 3px blur. Reduce this layer’s opacity to 75%.
Finally, you want the shadow to become less pronounced as it gets further away from the swan. Use a soft, low opacity erase brush to erase away the bottom part of your shadow partially.


Step 19

Now apply a gradient overlay adjustment layer, with a 20% layer opacity:

Step 20

Finally apply a color balance adjustment layer (settings below) to add a more murky, blue feel to the piece:

And We’re Done!

You can view the final outcome below. I hope that you enjoyed this tutorial and would love to hear your feedback on the techniques and outcome:


Final Image

As always, this is the final image that we’ll be creating:


THANKS TO:

http://psd.fanextra.com/tutorials/photo-effects/photo-manipulate-a-surreal-space-age-landscape/
Related Posts Plugin for WordPress, Blogger...